
Point of Sale
Point of Sale is the app you use at the cash counter. You sell, take money, print receipts and give refunds. At the end of the day, you count the money and see a report.
Everyone in your business can sell. Only an owner or manager can set up stores, counters and products.
Stores and counters
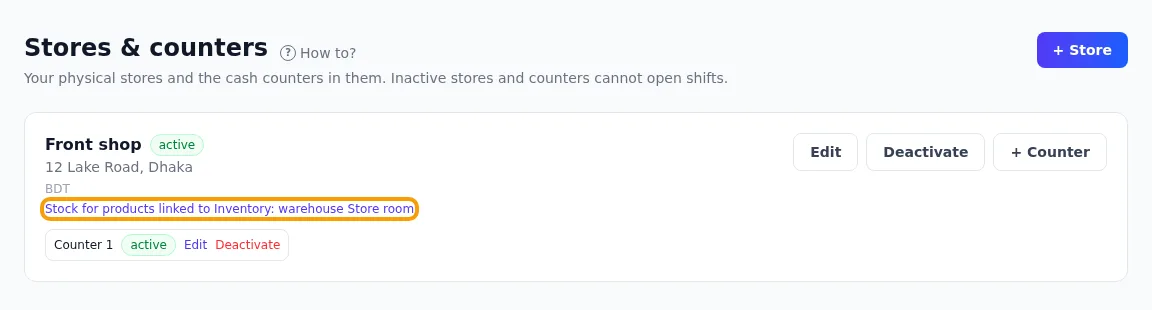
A new business already has one store, Main shop, with Counter 1. Add more only if you need them.
A store is your shop. A counter is one place in the shop where a cashier takes money.
- Go to Stores & counters. Press + New store.
- Type the store’s name and address. Press Add store.
- Press + New counter. Type a name, for example “Counter 1”. Press Add counter.
- Add one counter for each cash drawer in the shop.
- Next, press Start selling here → on the counter. It opens a shift on that counter, then the Sell page.
Good to know
- The tax region is only a note for you. Tax comes from each product’s own tax rate.
- You can rename a store or counter at any time.
- Turn off turns a store or counter off. Nothing is deleted. Turn on brings it back.
- You cannot turn off a store or counter while it has an open shift. Close the shift first.
Linking to Inventory
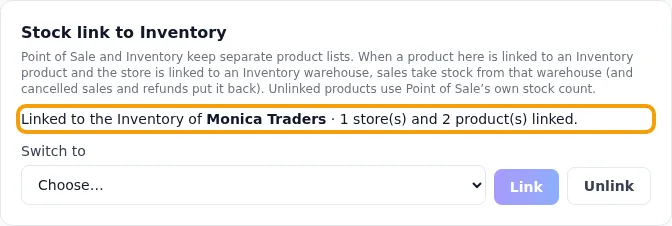
Stock is kept in one place: Inventory. Every product sold at the counter is an Inventory product, and each store sells from one Inventory warehouse. A sale takes its stock straight out of that warehouse by itself. A new business has both apps linked already; you only need to check each store’s warehouse.
- Go to Stores & counters. Press Edit on your store.
- Pick the warehouse this store takes its stock from. Save.
- Go to Products. Press + Product.
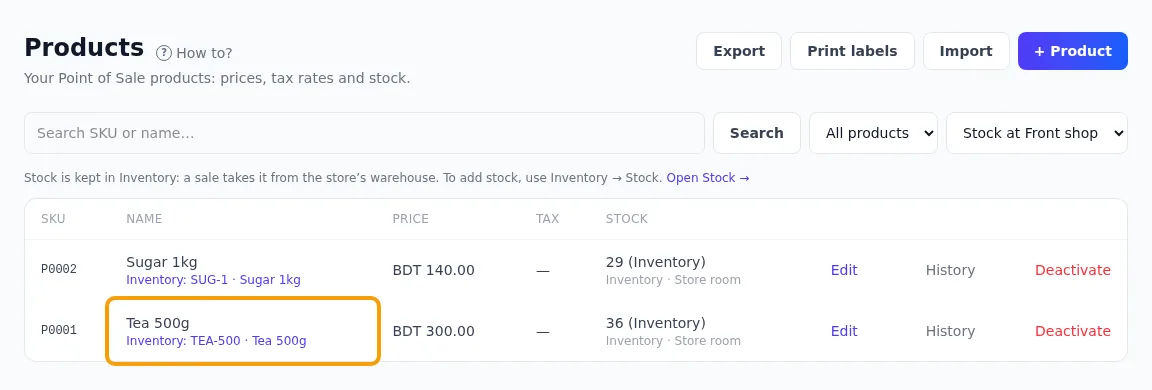
- In Already in Inventory? Choose it (optional), pick the product. Its code and name are copied, and it is linked.
- Type the selling price. Save.
Good to know
- Already have the product here? Press Edit on it and pick one in Linked Inventory product.
- Every sale shows in Inventory’s Stock history as a sale with the receipt number. A cancelled sale or a refund shows as a refund, and the goods go back into the lots they came from.
- A linked product cannot be sold at a store with no warehouse. Link the store first.
- A store sells from its one warehouse. Keep stock in a godown too? Move it into the store’s warehouse with Transfer stock in Inventory (on the Stock page). If a sale is short, it stops, and the Sell page says which warehouse has more and offers Transfer stock from … →, already filled in. A sale never takes stock from another warehouse by itself.
- You can see the link in Settings → Stock link to Inventory. Only a Point of Sale owner who is also an owner or manager in Inventory can move it to another business’s Inventory, or unlink it.
Products and stock
Point of Sale never adds products. A product is added in Inventory, in the purchase that brings its stock (Add a product), and it shows here and on the Sell page by itself, with its selling price. Here you set what the counter needs: the price and the VAT. Only active products show on the Sell page.
- Go to Products. Press Edit on a product.
- Change the Selling price. If there is VAT, type the percent in VAT / tax %: for 15% VAT, type 15. No VAT? Leave it empty.
- Press Save.
- An Inventory product with no selling price yet is listed under Set a price to sell: type the price and press Sell it.
- More stock: Purchase stock on its row opens Inventory’s purchase form with the product filled in.
Update prices from a spreadsheet
- Press Download sheet (CSV): every product, in the right columns. Change the prices in Excel or Google Sheets and save it as CSV.
- Press Update prices from a spreadsheet, then Choose CSV file.
- Read the check. Fix any row with an error in the sheet, and choose it again.
- Press Import … products.
Good to know
- Columns: sku, name, price, tax_percent, warranty_months, guarantee_months, warranty_note. Blank cells change nothing.
- It changes products you already have. A SKU that is not here is an error: new products are added in Inventory (in a purchase, or Import on its Stock page, which also takes their stock).
- Tax here is a percent: type 15 for 15%.
- If any row has an error, nothing is imported.
Print barcode labels
Stick a label with a barcode on each item. At the counter, scan it and the product goes into the cart.
- Buy A4 sticker sheets: 24, 40 or 65 labels on a sheet.
- Go to Products. Press Print labels.
- Pick the sheet. Type how many labels you want for each product. Or press 1 each or As many as in stock.
- Press Print … labels. A new tab opens with the sheets and the print window.
- Print at 100% (actual size), with no margins and no headers or footers.
Good to know
- The barcode is the product’s SKU. A label shows the shop name, product name, price and SKU. Untick Show the price to leave the price out. The 65-label sheet has no room for the shop name.
- Used part of a sheet already? Type the first empty label in Start at label no., counting left to right, row by row.
- A barcode takes only English letters, digits and signs. A product whose SKU has Bangla letters gets no label; the window names it. Change its SKU to print one.
- The labels are the products in the list now. Search first to print only some.
- If the browser blocks the new tab, allow pop-ups for this site.
Stock: kept in Inventory
The Stock column shows how many the store’s warehouse has, from Inventory. Point of Sale never changes stock by hand: a purchase brings it in, a sale takes it out, a refund puts it back. To fix a count or remove damaged goods, use Stock correction or Write off stock in Inventory (see How stock flows).
Good to know
- Each product needs its own SKU. Two products cannot share one.
- Editing a product never changes its stock. A product can be linked to another Inventory product, but not unlinked.
- A product from before every product was in Inventory shows Not in Inventory yet and cannot be sold: press Edit and pick its Inventory product.
- Warranty means free repair. Guarantee means a free replacement. They come from the Inventory product (set them there).
- The cart and the receipt show the warranty and guarantee, with their end dates.
- Find a product with the Search SKU or name… box. If you are linked to Inventory, the Stock at … list picks which store’s stock you see.
- Turn off hides a product from the Sell page. It asks you to confirm. Its history stays. Turn on brings it back.
Shifts
▶Step by step in pictures: the cash drawer and closing the shift13 pictures. In each, an orange ring shows where to type or tap.Start →A shift is one person’s work time at one cash counter. You must open a shift before you can sell.
- Go to Sell. Press Open a shift to start selling. (Or Open shift in Shifts.)
- Your counter is already chosen when there is only one.
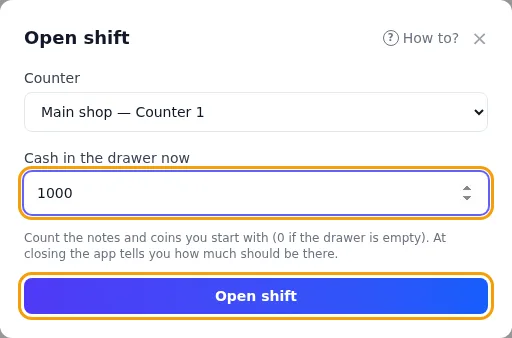
- Count the money in the drawer. Type it in Cash at start (what is in the drawer now). Empty? Type 0.
- Press Open shift. Now you can sell.
- At the end of the day, go to My shift and press Close shift.
- Count all the notes and coins again, carefully: after closing it cannot be changed. Type the total and press Close shift.
- The first line says it all: The drawer is exactly right, or how much is short or over. Below it are the numbers. Press See the day’s report or OK.
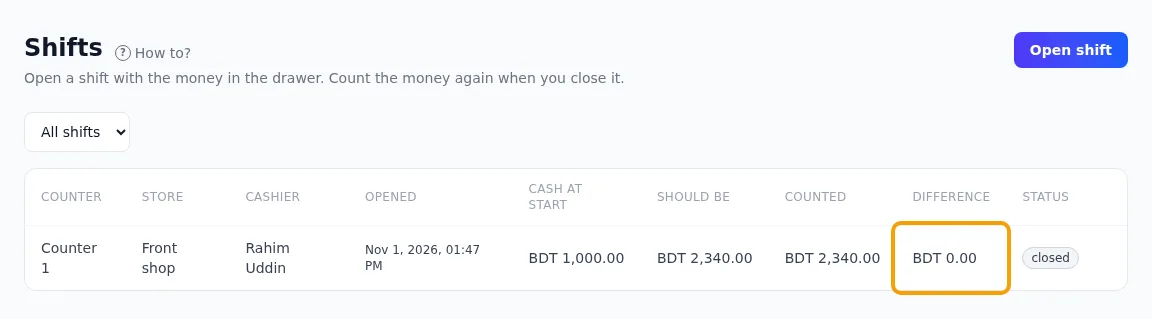
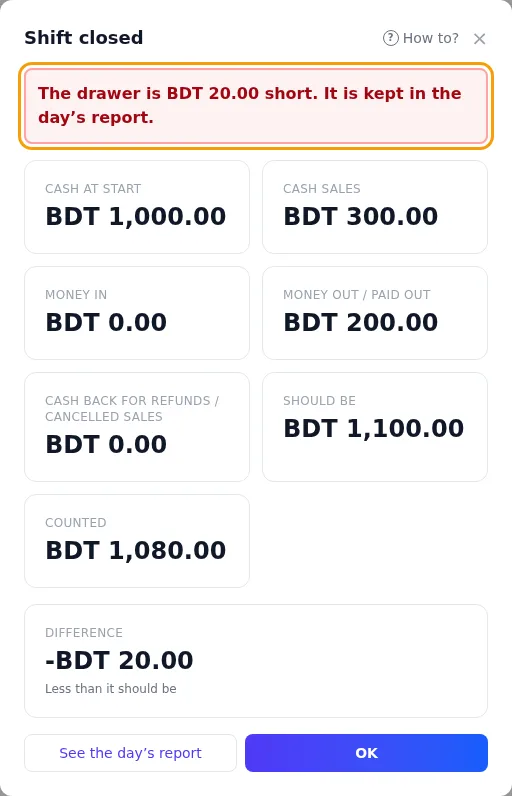
| Cash at start | + |
| Cash from sales on this shift | + |
| Due collected in cash | + |
| Money in | + |
| Money out and paid out | − |
| Cash given back for cancelled sales and refunds | − |
| = Should be |
Sales on due bring no money into the drawer, so they are not in “should be”. When you close the shift, the app tells you how much was sold on due in it.
Good to know
- One counter = one open shift at a time.
- Cashiers sell on, and close, only their own shift. Owners and managers can use and close any shift.
- A closed shift cannot be changed. Nothing more can be added to it.
Selling
▶Step by step in pictures: selling at the counter21 pictures. In each, an orange ring shows where to type or tap.Start →- Go to Sell. Check that the cart shows your counter.
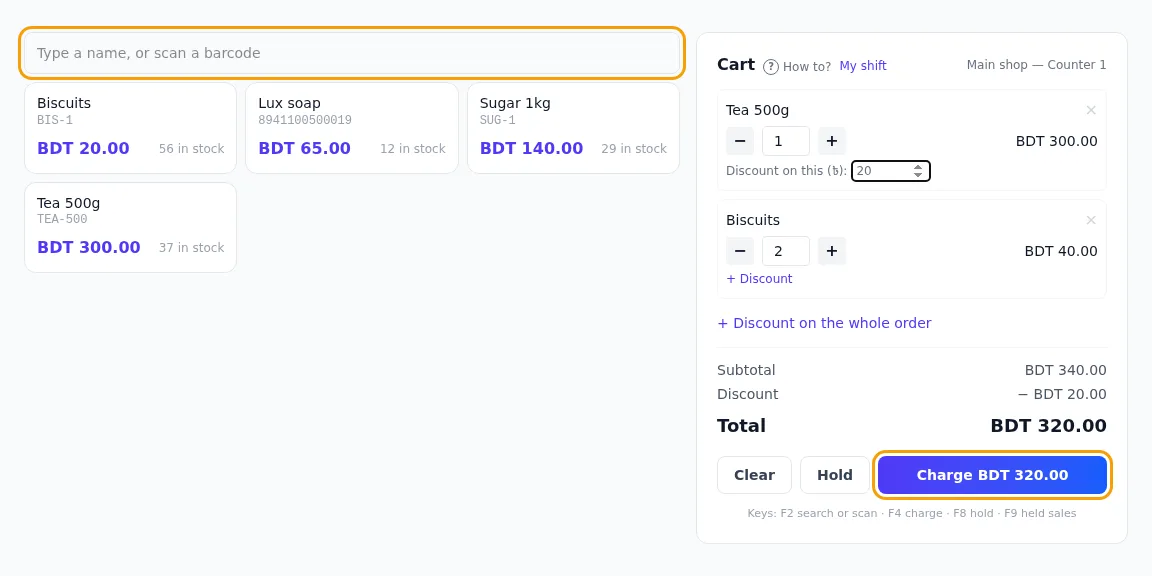
- In the box at the top, type the product’s name or scan its barcode. Tap the product to put it in the cart. (Only one matches? Enter adds it.)
- Change the number with − and +. Press × to take a product out. Clear empties the cart.
- Need a discount? Press + Discount under one line, or + Discount on the whole order, and type the taka off.
- Press Take ৳…. It shows the total. Now take the money (see below).
A product with a photo shows it on its card and in the cart, so the right one is easy to spot. Photos are added in Inventory: Product photos.
Good to know
- Tax is added by itself, from each product’s tax rate.
Loose goods by weight or volume
▶Step by step in pictures: loose goods by weight19 pictures. In each, an orange ring shows where to type or tap.Start →Rice, lentils, sugar or oil sold loose: the product is sold by kg (or litre), and its price is per kg.
- Tap the product. A window asks How much?
- Type the weight (1.25 for 1¼ kg), or type the money — “৳100 of rice” works out the weight — or tap 250 g, 500 g, 1 kg or 2 kg.
- The cart line reads 1.25 kg × ৳75/kg. Press it to change the amount.
- Set it on the product: Sold by → By weight (kg) or By litre (liquids) (Inventory → Stock, or Products here). Its stock, orders and low-stock level are then in kg or litres, with decimals.
- A refund of part of it asks how much came back, in kg.
- Sold by cannot change once the product has stock or sales: add a new product instead.
- Weighing-scale connections and scale barcodes are not in the app yet: the cashier types the weight.
A product that is not in the list yet
You scan a barcode and the page says The product with code … is not added yet. You can add it right there.
- Press + Add it now in the message.
- The barcode is filled in. Type the name and the selling price.
- Inventory has a product with this SKU? It is linked, and if the store has stock of it, press Add and put in the cart and go on with the sale.
- New to Inventory too? Press Add the product. It has no stock yet: its purchase has to be recorded in Inventory (Purchase stock) before it can be sold.
Good to know
- Only someone who may edit products sees the button. A cashier sees Ask your manager to add it in Products.
- It never asks how many you have: stock comes in with a purchase in Inventory.
- Tax and warranty can be set later in Products.
Hold a sale
A customer went to fetch one more thing? Hold their cart and serve the next person.
- Press Hold. The cart is kept and empties for the next customer.
- To go back to it, press Held sales under the cart.
- Press Bring back on the sale. Or Throw away if the customer left.
Good to know
- If the cart has items when you bring one back, those items are held too. Nothing is lost.
- A held sale comes back with today’s prices. A product that can no longer be sold is taken out, and the page says so.
- Held sales stay on this computer or phone, for this shift. They are removed after one day.
- Holding does not keep the stock aside. Stock leaves only when the customer pays.
Keyboard keys
| Key | What it does |
|---|---|
| F2 | Go to the box at the top: type a name or scan |
| F4 | Take payment |
| F8 | Hold the sale |
| F9 | Show held sales |
Taking payment
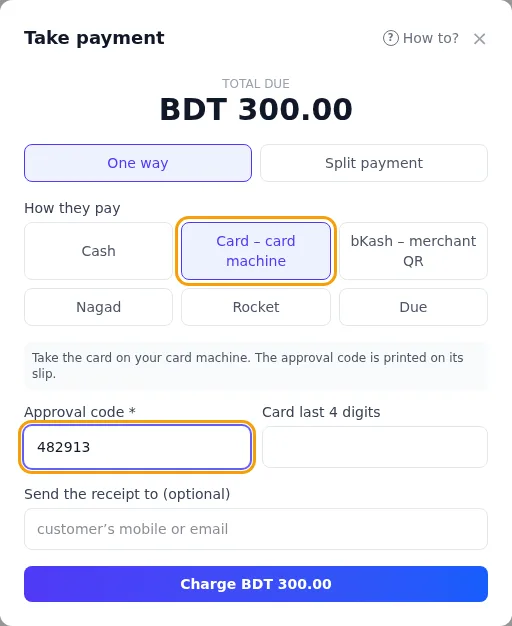
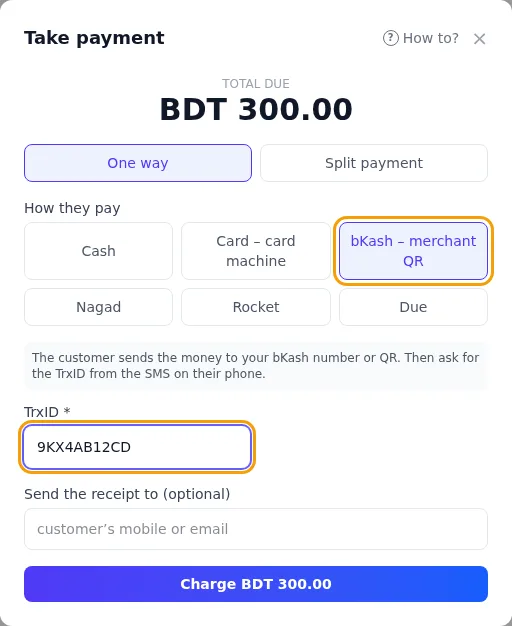
In the Take payment window, under How they pay, press the way the customer pays. There are six from the start:
| Way to pay | What the cashier does |
|---|---|
| Cash | Type the cash the customer gives in Cash given, or tap a quick amount. The app shows the change. |
| Card – card machine | Take the card on your card machine. Type the approval code printed on its slip (you must). You can also type the last 4 digits of the card. |
| bKash – merchant QR | The customer sends the money to your shop’s bKash number or QR. Ask for the TrxID (the transaction number in the SMS on their phone) and type it (you must). |
| Nagad | Same as bKash. Type the TrxID (you must). |
| Rocket | Same as bKash. Type the TrxID (you must). |
| Due | The customer pays later. Pick who (see The due book below). |
Below the ways to pay is Customer. Every sale says who it was for. Did not want to give a number is chosen at the start: if the customer will not give their mobile number, just take the payment. Otherwise type a few digits of their number (or their name, once you have typed one) and pick them, or press + New customer: a window asks for the mobile number and name. The receipt shows the customer, and their mobile fills the WhatsApp box. A sale on due must name a real customer: who pays later.
Split payment
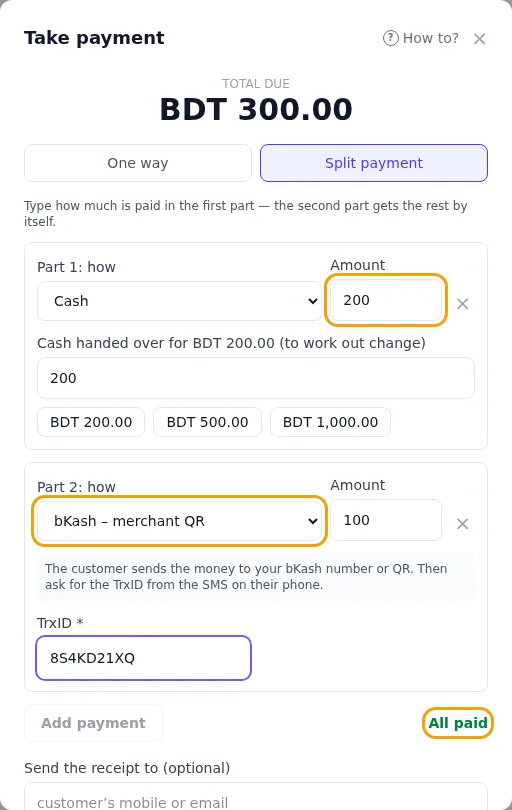
Some customers pay part in cash and part another way. For example, ৳200 in cash and ৳100 by card.
- The window starts at One payment. Press Split payment.
- At Part 1: how, pick the first way and type how much is paid that way.
- Part 2 gets the rest by itself. Pick how it is paid.
- Three ways? Press Add payment. Pay when it says All paid.
After you take the money
The sale is done at once. The stock goes down and the receipt appears. Press Print, or press New sale for the next customer.
Good to know
- Only cash goes into the drawer count. Card and wallet money does not.
- Want to send the customer a receipt? Do it after the sale, under Print (see Send the receipt on WhatsApp).
Receipts, cancelled sales and refunds
▶Step by step in pictures: receipts, refunds and cancelling a sale15 pictures. In each, an orange ring shows where to type or tap.Start →Every sale has a receipt.
- Go to Receipts & refunds. You see the latest 200. To find one, type a product, the customer or the receipt number, or pick a day. While selling, This shift's sales above the cart shows only the current shift.
- Above the list, four boxes add up what is shown: Sales (how many), Sold, Refunded and After refunds. Sales awaiting payment and cancelled sales are not counted.
- Tap a receipt to see the items and how the customer paid.
- Press Reprint to print it again, or WhatsApp to send it. (Email receipt shows when an email was typed after the sale.)
When your money is taka, the receipt also shows the total in words under it, as on a bill: “Taka one thousand two hundred only”, or in Bangla “এক হাজার দুই শত টাকা মাত্র”.
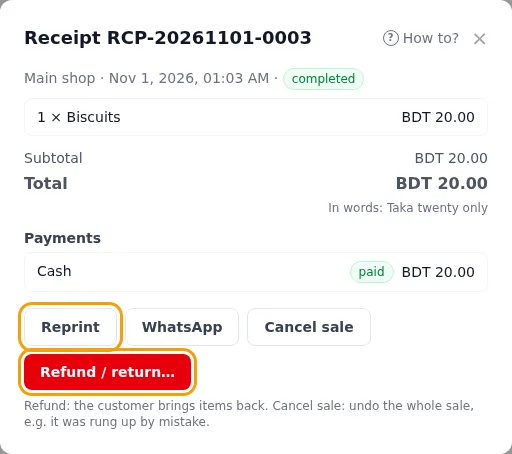
If an item has a warranty or guarantee, the receipt shows it under the item with its end date. Check it there when a customer brings an item back.
Refund part of a sale (owner or manager)
- Open the receipt. Press Refund….
- Press + for each one that comes back, or All. (A sale of one item starts at 1.)
- Tap a reason, or write one.
- Did the customer pay in more than one way? Pick which payment the money goes back to.
- Paid by bKash, Nagad or Rocket? First send the money back to the customer’s wallet, then type that TrxID. By card? Refund it on the card machine first, then type the code from its slip.
- Press the button. It says how much, for example Refund ৳65.
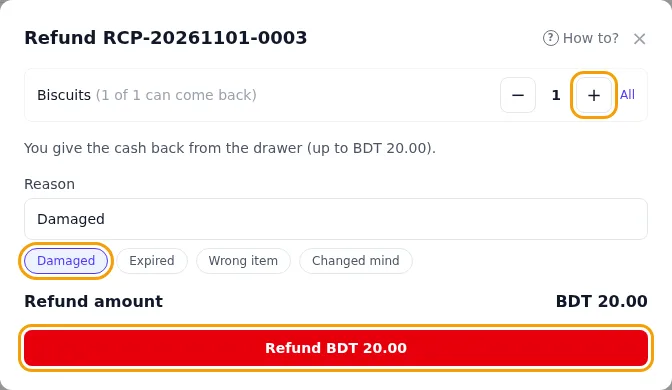
The refund slip opens with what to do now in big letters, for example Give the customer ৳65 from the drawer. The items go back into stock. The first receipt now shows partially refunded or refunded.
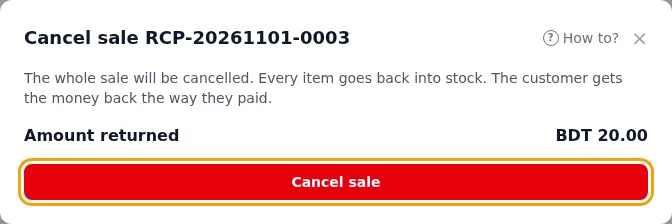
Cancel a whole sale (owner or manager)
- Open the receipt. Press Cancel sale.
- Check the amount to give back.
- Press Cancel sale again at the bottom.
Every item goes back into stock. The page then says what to do now for each payment, for example Give the customer ৳110 from the drawer or Send ৳110 back to the customer’s bKash.
Good to know
- You can refund only what is left to refund.
- Cash is given back only from an open shift. The app uses the sale’s own shift if it is still open. If not, it uses the open shift on the same counter. You can also pick one in Which shift’s drawer gives the cash back.
- No shift open? Open one first.
- Cashiers cannot give refunds or cancel a finished sale.
- A refund receipt cannot be cancelled or refunded.
Send the receipt on WhatsApp
- After a sale, press Print and give the paper receipt.
- Customer wants it on WhatsApp too? In Send the receipt too? under Print, type their mobile number, for example 01712345678. A due customer’s number is already filled in.
- Press WhatsApp. WhatsApp opens with the receipt typed. Press send there.
Good to know
- It is sent from the WhatsApp on this phone or computer (the app, or WhatsApp Web). It costs nothing.
- Leave the number empty to choose the person inside WhatsApp.
- Type an email address instead and the button says Email: the receipt is emailed.
- An older receipt? Open it in Receipts & refunds and press WhatsApp.
- The message has the shop name, receipt number, items, total, the total in words, and the change.
The due book (বাকি)
▶Step by step in pictures: selling on due (বাকি) and collecting it22 pictures. In each, an orange ring shows where to type or tap.Start →A regular customer takes the goods now and pays later. Point of Sale remembers what each one owes.
Sell on due
- At Take payment, press Due.
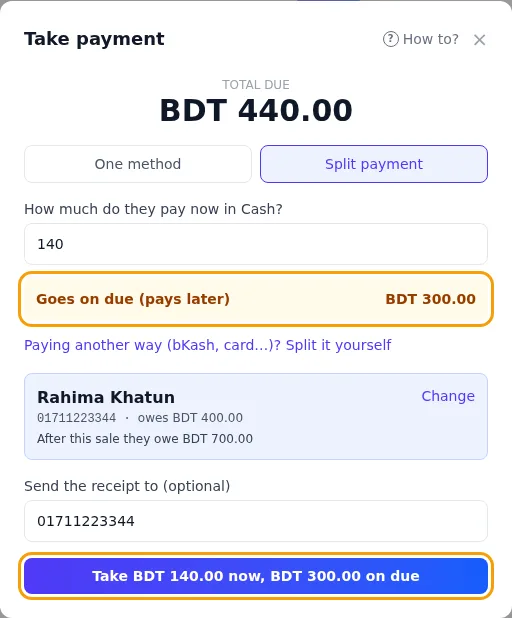
- Paying some now? Under Due, press Paying some in Cash now? The rest goes on due →.
- Type the cash in How much do they pay now in Cash?, for example ৳500.
- Below it you see what goes on due.
- Under Who pays later?, search the customer by name or mobile number and pick them.
- New customer? Press + New customer. In the window, type the mobile number and the name, and press Add customer.
- The window shows what they owe now and what they will owe after this sale. Press the button at the bottom. It says what happens, for example Put ৳440 on due or Take ৳200 now, ৳400 on due.
The sale is done at once and the stock goes down. The receipt shows the customer, On due from this sale — pays later and They owe now, in all.
See who owes what
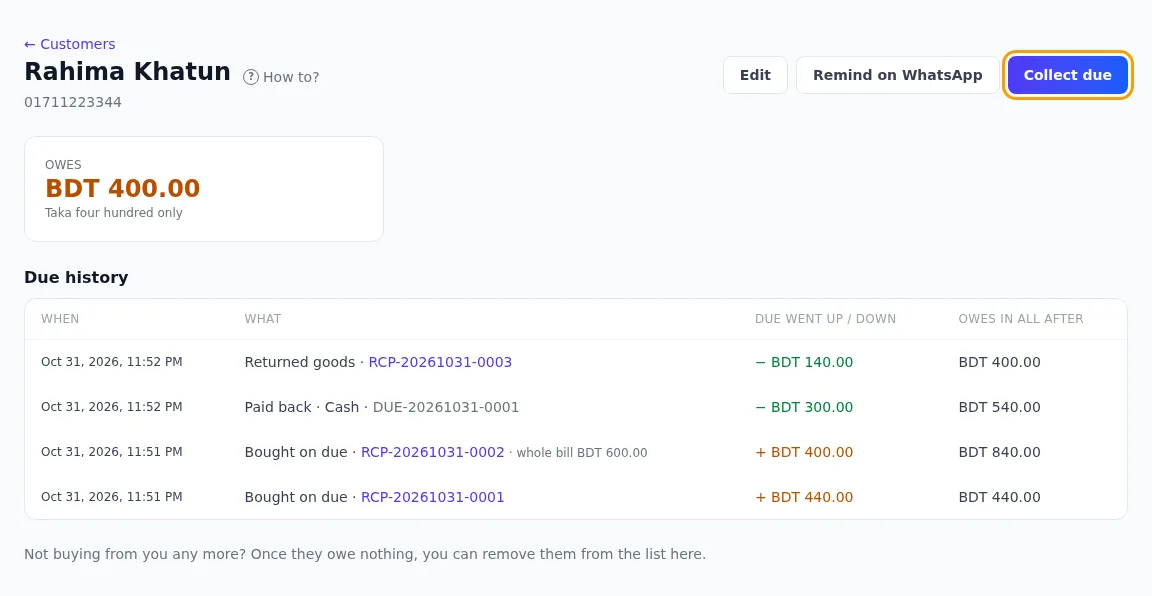
Go to Due book. The box at the top shows how much is owed to you in all. Press Owes money to see only the people who owe, most first. Open a customer: Due history shows when they bought on due and when they paid back, with what they owed in all after each one. Press a receipt number to open that receipt.
A customer is added only at the counter, in a sale on due, so every amount owed comes from a sale. On the Due book, Edit changes a customer’s name, mobile number or due limit.
Collect due
- Open the customer. Press Collect due.
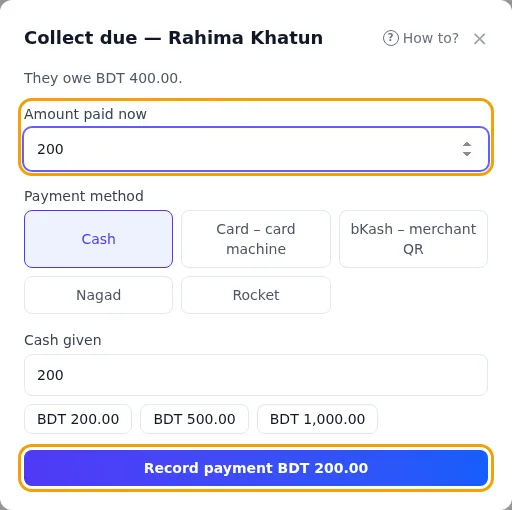
- Type the money in Amount paid now. It starts at everything they owe; if they pay less, delete it and type the amount.
- Pick how they pay: cash, card, bKash and so on. For cash, type the money they give; the app shows the change. For the others, type the reference, as at a sale.
- Press Record payment. A slip appears. Print it, or send it on WhatsApp.
To remind a customer, open them and press Remind on WhatsApp. WhatsApp opens with “you owe …” typed for you.
Good to know
- Cash you collect goes into the drawer of your open shift, so you need an open shift to take cash. It shows in the drawer as Due collected in cash and in the end-of-day report.
- You cannot collect more than they owe.
- Don't want someone to owe too much? Give them a Due limit in Edit. A sale on due that takes them over it is refused. Empty means no limit.
- Refunding or cancelling a sale on due lowers what they owe. No money is given back. The refund slip says Taken off what they owe and They owe now, in all. Had they already paid? Then the shop owes them. Their next sale on due uses it up.
- A mobile number belongs to one customer only. Typing a number that is already there shows that customer to pick.
- Someone stopped buying? Once they owe nothing, press Remove from the list at the bottom of their page. Their history stays. Tick Show removed customers too, open them and press Bring back to the list to undo it.
- Who may sell on due, see customers, add them and collect is set in Roles. At the start, owners and managers may do all of it. Cashiers may see and add customers and collect, but not sell on due.
The cash drawer
Sometimes you put money in the drawer, or take it out, without a sale. Write it down here.
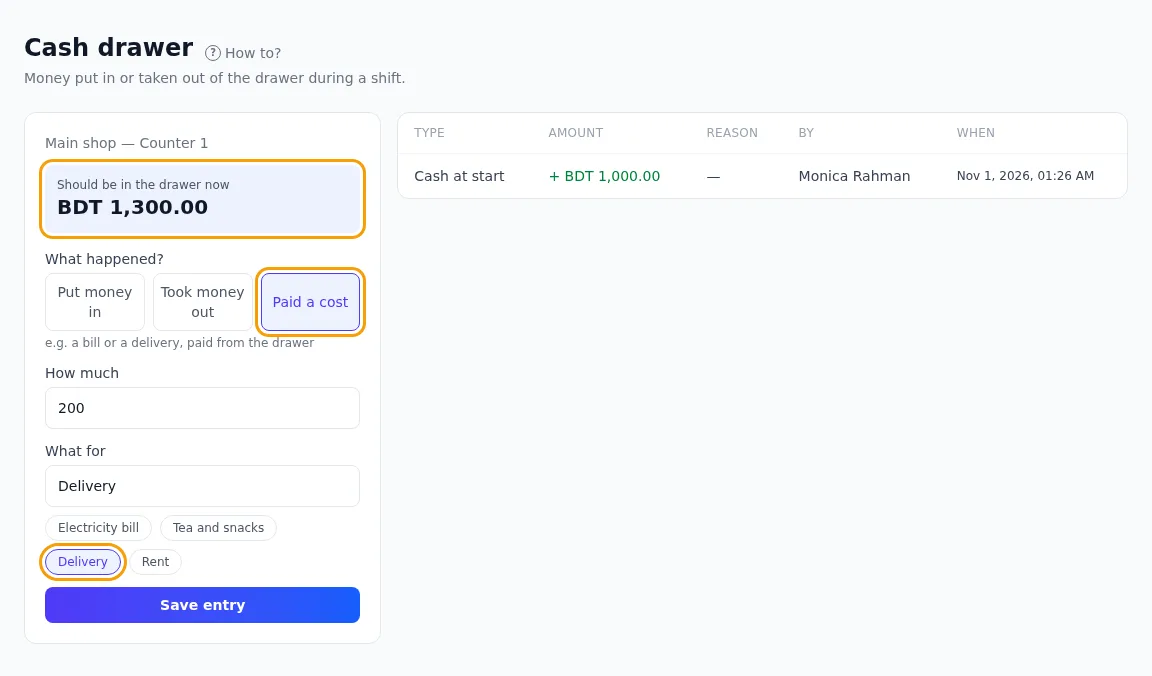
- Open a shift first.
- Go to Cash drawer.
- The top shows how much should be in the drawer now.
- Under What happened? press one:
- Put money in: for example more change.
- Took money out: for example to deposit at the bank.
- Paid a cost: a bill or a delivery paid from the drawer.
- Type how much, and what for (tap one of the ready reasons, or write your own). Press Save entry.
Good to know
- The list shows every entry, with who and when. It also shows the cash at start, cash given back for cancelled sales and refunds, and the count at close.
- You cannot take out more than should be in the drawer. If there is more, write it in with Put money in first.
- Money taken out always needs a “what for”, so the owner knows later.
- You cannot change or delete an entry.
- You cannot add anything to a closed shift.
- A cashier sees and uses only their own shift.
The end-of-day report
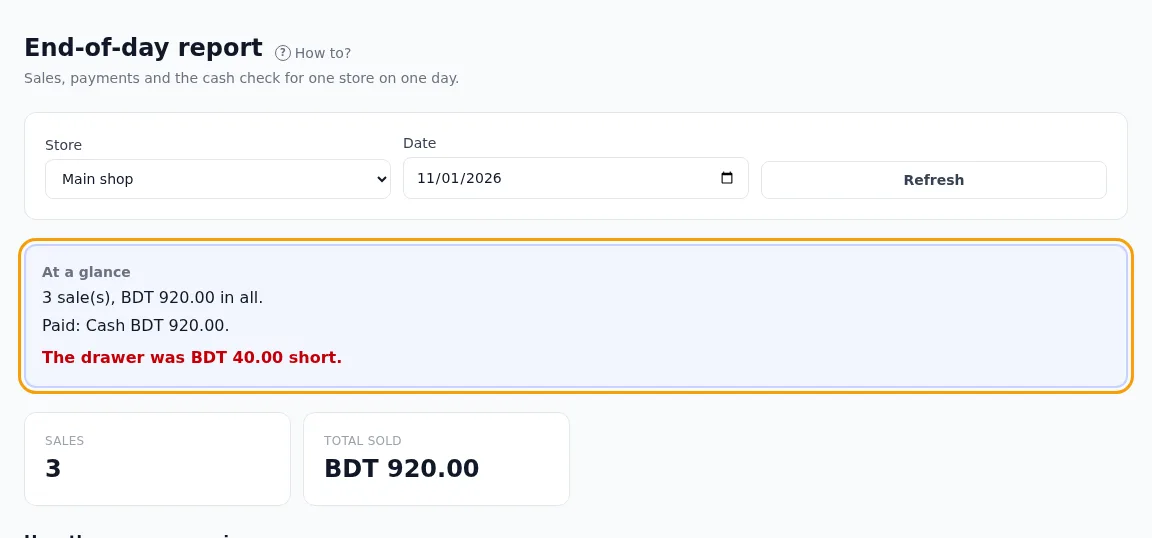
- Go to Reports. Today’s report for your store shows by itself.
- Another day or another store? Pick it at the top.
The report shows:
- At a glance: a few plain lines. How many sales and how much in all, what was given back, how the money came (cash, bKash…), what went on due, and whether the drawer was right.
- The number tiles: Sales, Total sold, and when there were any, money given back, tax, discounts and cancelled sales.
- Profit (owners and managers): what the goods sold for without tax, What those goods cost (each lot at what you paid, oldest first), and the profit. Goods with no buying price yet are left out, and the report says how much.
- How the money came in: how much came each way, how much was given back, and what is left. A split sale counts in each way it was paid.
- Top products: what sold most.
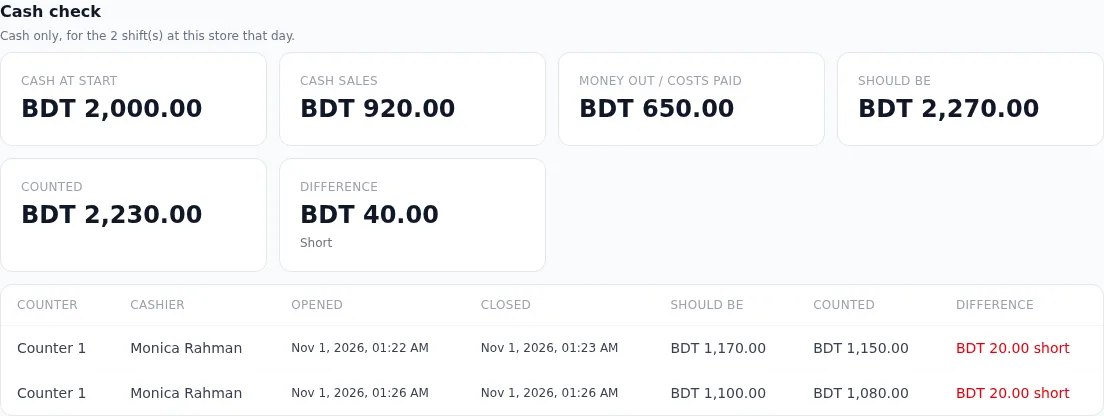
- Cash check: cash only, for every shift that day. How much should be there, how much was counted, and how much short or over.
Good to know
- Anyone in the business can run the report. It changes nothing.
- A sale counts on the day it was made. A refund counts on the day it was given, at the store whose shift paid it.
- A day runs from midnight to midnight, Bangladesh time. (A shop in another country can change its time zone in Settings → Business.)
- Receipt numbers use the same date.