
Inventory
Inventory shows what stock you have, where it is, and what you have ordered. You never just type over a stock number. Each time stock comes in or goes out, the app writes it down. This list is kept forever, so you can always see why a number is what it is.
Owners, managers and staff can make changes. Viewers can only look.
New here? First see How stock flows: the whole path from buying to selling, in one picture.
Warehouses
A new business already has one warehouse, Shop. Add more only if you need them.
A warehouse is any place where you keep stock. It can be a store room, a back shelf or a second shop.
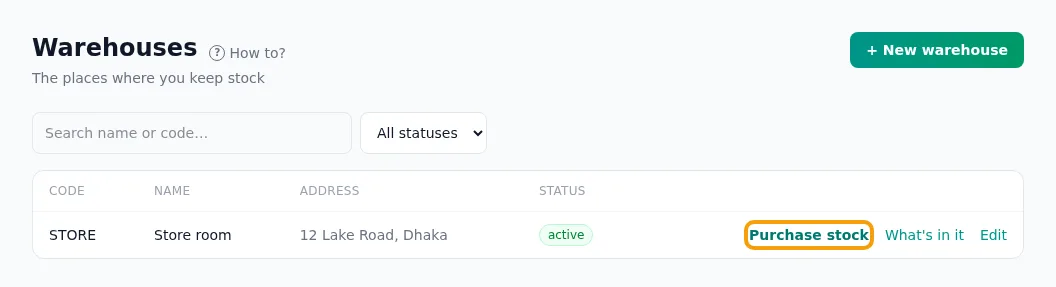
- Go to Warehouses. Press + New warehouse.
- Type a name, for example Back room. The address is optional.
- Want your own short code, for example STORE? Type it in Code (optional). Empty means the app makes one (WH1, WH2…).
- Press Add warehouse.
- Next, on the warehouse’s row: Purchase stock opens the purchase form with that warehouse already chosen. What's in it shows what is in it.
- Big store room? You can label its shelves. Press Edit on the warehouse, open Shelf labels (optional), type a Shelf code, for example A1, and press Add shelf. A small shop can skip this.
Good to know
- Shelf codes only help you find things. Stock is counted for the whole warehouse, not per shelf.
- You can change the name and address later. The code cannot change.
- You cannot delete a warehouse. An owner or manager can make it inactive instead.
- An inactive warehouse is hidden from the lists. Stock cannot come in or go out of it, and you cannot use it on new orders. Its history stays. Make it active again to use it.
Stock: your products
The Stock page lists what you sell and how many you have. You add products here; their stock comes in with Purchase stock. The page also has Transfer stock, Stock correction, Write off stock and the link to Stock history.
Each product has:
- a code (SKU: your own short code, for example TEA-500, or the barcode number; empty means the app makes one),
- a name, a selling price, and a cost: what you paid for one, which comes from its purchases,
- Warn me when stock falls to (the low-stock level): when stock falls to this number or below, the app warns you,
- a Reorder amount: how many you usually buy at a time.
- Go to Purchases and press Purchase stock (a product is added in the purchase that brings its stock).
- On a line, open the product list and pick + New product… at the end.
- Type the Product name, how it is sold (piece, kg or litre) and the Selling price.
- Open More: code, low-stock level, warranty to type your own code (SKU), the low-stock level and the reorder amount. Leave the code empty and the app makes one (P0001…).
- Press Add product. You are back on the purchase, with the product on that line: type how many and the cost of one, and save the purchase (see Purchases). Goods already on your shelf are a purchase too: pick roughly the day you bought them.
- Many products at once? On Stock, use Import from a spreadsheet.
Good to know
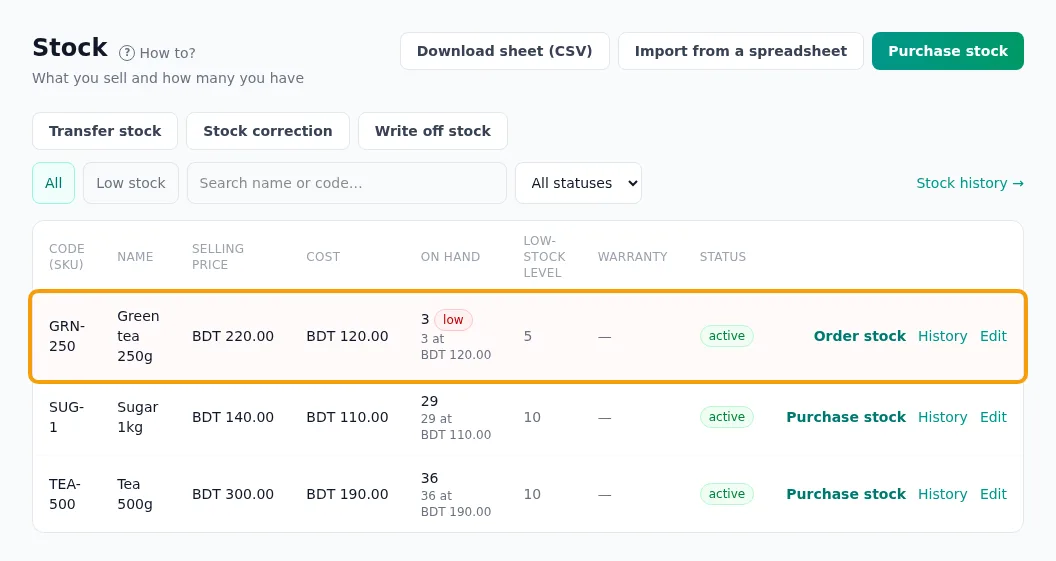
- The list shows how many you have, in all warehouses together. When a product is in more than one warehouse, how many are in each shows under the total.
- On each row: Purchase stock (or Order stock when it is low) opens the purchase form with this product filled in; History shows its lines in Stock history.
- What your stock cost: under the number, for example “40 at ৳60 · 20 at ৳70”. Each lot keeps the price it was bought at. Stock going out (a sale, a transfer, a correction, a write-off) takes the oldest lot first, so a sale knows what its goods really cost. A transfer takes the lots, with their prices, to the other warehouse. A refund puts them back.
- “price not known” is older stock that came in without a price. Type the product’s Cost price with Edit: that stock takes it. Stock bought from now on always has its price, from its purchase.
- Have more than one warehouse? Pick one in the All warehouses box to see only its stock, or press What's in it on the warehouse’s row. The top then says Showing: and the warehouse; press × to see all. The low-stock warning still counts all warehouses together.
- Press Edit to change the name, the prices and the two numbers later. The code (SKU) cannot change.
- Warranty and guarantee are optional. Warranty means free repair. Guarantee means free replacement. Type the number of months for each (0 means none). You can add a note, for example who gives the warranty.
- Point of Sale products linked to this product are sold with the same warranty. The receipt shows the end date, counted from the sale day. When you receive stock, the form shows the product’s warranty.
- An owner or manager can make a product inactive. Then it is hidden from the lists. It cannot be moved, ordered or sold.
Import from a spreadsheet
Already keep your products in Excel or Google Sheets? Add them all at once.
- In your spreadsheet, save the sheet as CSV (File → Save as or Download → CSV).
- Go to Stock. Press Import from a spreadsheet.
- Press Choose CSV file and pick the file.
- If the sheet has a stock column, that stock is recorded as one purchase: choose Where it was bought, When it was bought and the warehouse it goes into.
- Read the check. Each row says New, Update, No change or Error.
- Rows with errors? Fix them in the sheet, save it again and choose it again.
- Press Import … products.
Good to know
- The first row holds the column names: sku, name, cost_price, reorder_point, reorder_qty, warranty_months, guarantee_months, warranty_note, opening_stock. Press Download a sample sheet to start from one.
- Only the sku column (the product’s code) is needed. A new product also needs a name. Other columns are optional, in any order.
- A code you already have is updated. A blank cell leaves that field as it is.
- The stock column is only for new products. More of a product you already have comes in with a purchase.
- If any row has an error, nothing is imported. So a half-done import never happens.
- Bangla digits, commas (1,250) and ৳ are fine in number cells.
- Download sheet (CSV) downloads the list in the same columns. Change it in Excel and import it back.
Low stock
A product is low when what you have is at or below its low-stock level. Only active products are checked. You see these products in the Low stock tab and on the Dashboard. Then you know what to order next.
Order stock on a low product’s row, or Order stock → above the list, opens the purchase form filled in (see Order stock). The app never places an order by itself.
Suppliers and price lists
▶Step by step in pictures: buying stock from a supplier19 pictures. In each, an orange ring shows where to type or tap.Start →A supplier is where you buy from: a shop, a company, or a market where you buy from whoever is selling.
- Go to Suppliers. Press + New supplier.
- Type Where you buy (required): the market or the shop’s address, for example Karwan Bazar, Dhaka.
- Name of the shop or person is optional. Bought from someone you do not know, at a market? Leave it empty: lists show the place instead. Contact person, email, phone and payment terms are optional too.
- Press Add supplier.
You can keep a price list for each supplier: what they charge you for each product.
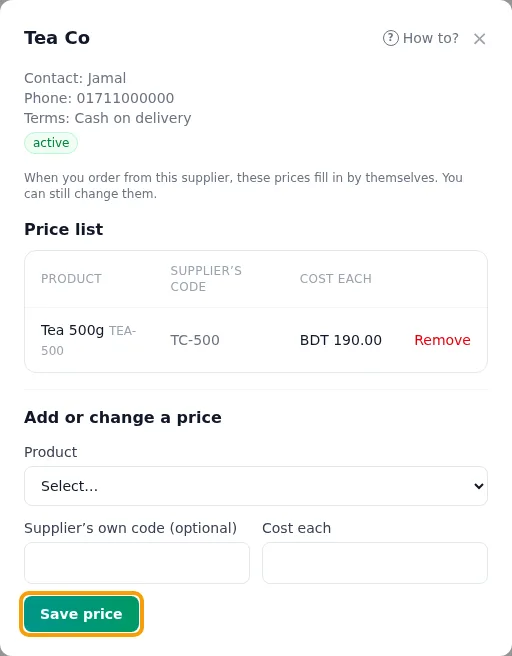
- Press Open on the supplier. Its Price list is at the top.
- Pick a product.
- Type the Supplier’s code (the code the supplier uses for it) and the Cost each.
- Press Save price.
Good to know
- Purchase stock on a supplier’s row opens the purchase form with that supplier already chosen.
- To change a price, save the same product again.
- Remove takes a product off the price list at once.
- When you order from this supplier, each item’s cost fills in from this price list. You can still change it. Your product’s own cost does not change.
- You cannot send new orders to an inactive supplier. But orders already sent to it can still be received and closed.
Purchases (Purchase stock)
Every time stock comes in, it is a purchase, recorded with Purchase stock. It is one form wherever you press it — the Stock page, a product’s row, Purchases, a supplier’s row, a warehouse’s row — and from a product, a supplier or a warehouse that part is already filled in. The stock goes in, and a purchase record is kept with its number, where you bought, what, at what price, the total and the bill number.
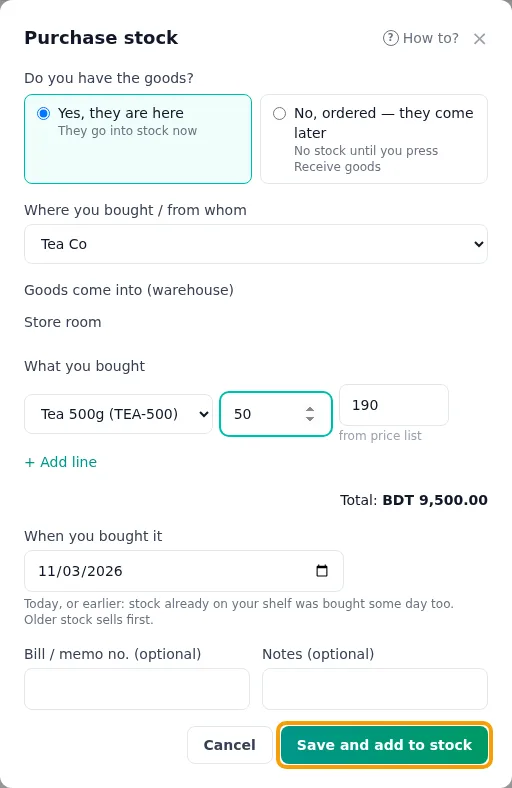
- Press Purchase stock.
- In Where you bought / from whom, the place you bought from last time is chosen already. Another one? Pick it from the list. A new one? Pick + New supplier… at the end of the list: the New supplier form opens over the purchase. Save it and the supplier is chosen.
- Pick the warehouse in Goods come into (warehouse) (with only one, it is already chosen).
- Add each product, how many, and the cost of one. A product you have not added yet? Pick + New product… at the end of the list. The cost is remembered for that place: next time it fills in by itself.
- When you bought it is today. Recording what is already on your shelf? Pick the day it was bought (roughly is fine): older stock sells first.
- Type the Bill / memo no. from the paper bill if you like.
- Do you have the goods? — Yes, they are here: press Save and add to stock. The stock goes up at once, and the purchase shows received.
- Or No, ordered — they come later: press Save order. It is saved as a draft, and no stock comes in yet.
Receive goods
An order you wait for goes through these steps:
- Gave the order to your supplier? Open it and press Mark sent, so you know it is on its way. (You can skip this.)
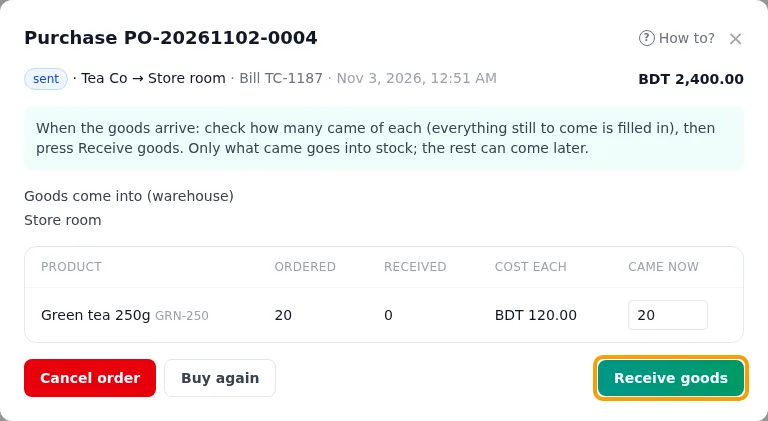
- When goods arrive, open the order. Everything still to come is filled in. If less came, change the number.
- Press Receive goods. Only what came goes into stock.
- When everything has come, press Close.
Good to know
- Buy the same again? Open an old purchase and press Buy again: the purchase form opens with the same place and lines, at the latest prices. Change what is different and save.
- To see what you spent: type a place or supplier in the search box and pick a Month. The line above the list adds it up.
- A purchase is the only way stock comes in. There is no other “add stock” anywhere.
- You cannot receive more than is still to come, so the same goods never go in twice. You can receive into the order’s warehouse or another active one.
- If only some goods came, the order shows partly received. When all have come, it shows received. This happens by itself.
- If the rest will not come, press Close (no more to come) and confirm.
- You can cancel an order with Cancel order only if nothing has been received yet. The app asks you to confirm.
- A closed or cancelled order cannot be changed. After you save an order, you cannot change its supplier, warehouse or products: cancel the draft and make a new one.
Order stock (running low)
Order what is running low, from the right suppliers, through the same purchase form.
- One product: on the Low stock tab, press Order stock on its row. The purchase form opens as an order, with the product and its reorder amount filled in.
- Everything low: press Order stock on Purchases (or Order stock → on the Low stock tab or the Dashboard).
- Check each product’s amount and supplier. Untick what you do not want.
- Press Order from … for a supplier. The purchase form opens with that supplier’s lines, as an order. Check it and press Save order.
- Do the same for the next supplier. When the goods come: Receive goods.
Good to know
- The amount is the product’s reorder amount. With none set, it is enough to reach twice the low-stock level.
- The supplier is the cheapest on the price lists. With no price list, it is the supplier you last ordered it from.
- A product already on an open order shows how many. If that order is enough, it starts unticked.
- Nothing is ordered, and no stock changes, until you save the purchase form.
Transfer, correct, write off
Besides buying and selling, stock changes in only three ways, each with its own button on the Stock page (and on Stock history):
| Button | When | What it needs |
|---|---|---|
| Transfer stock | Moving goods you have from one warehouse to another | The product, from, to, how many |
| Stock correction | You counted, and the shelf and the app disagree | The product, the warehouse, how many you counted, and why |
| Write off stock | Goods you have but cannot sell: expired, damaged, lost | The product, the warehouse, how many, and why |
Transfer stock
- Press Transfer stock.
- Pick the product, From and To. The form shows how many can move.
- Type How many, and a note if you like. Press Transfer stock.
The lots move with their prices and dates. From the Sell page, a short sale opens this form already filled in.
Stock correction
- Press Stock correction.
- Pick the product and the warehouse. The form shows The app has.
- Type How many you counted. The form says how many fewer or more that is.
- Type Why, for example counted the shelf. It is required. Press Stock correction.
Fewer: the oldest lots go down. More: the extra is added at the price of the latest purchase. New goods are not a correction: the form links to Purchase stock →.
Write off stock
- Press Write off stock (or, for an expired batch, Write off stock on the Expiry page: the form opens filled in).
- Pick the product and the warehouse. A product with expiry dates: pick Which batch, or leave Expired first, then the oldest.
- Type How many, and pick Why: Expired, Damaged, Lost or stolen or Other…. Press Write off stock.
What the written-off goods cost is kept on the line, so you can see what the loss cost you.
Stock history
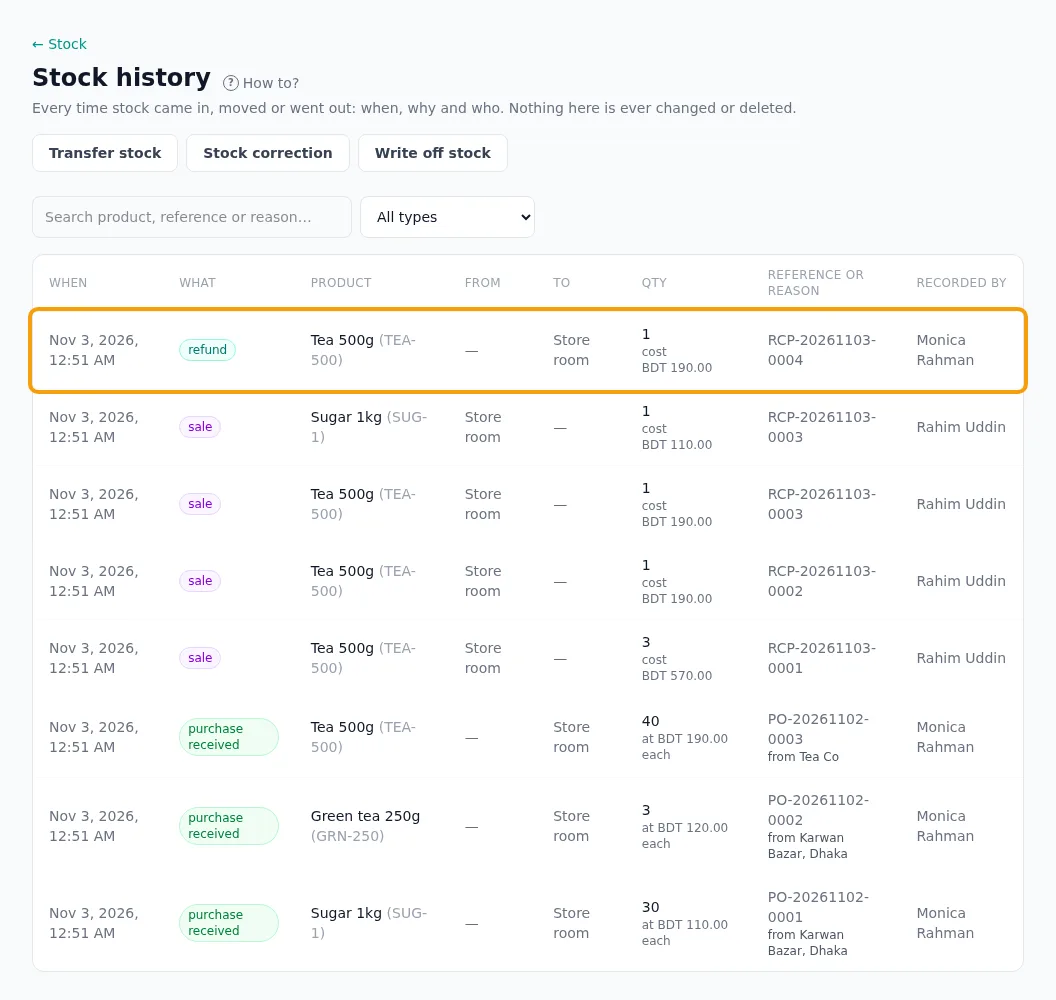
Stock history (the link on the Stock page) lists every time stock came in, moved or went out: when, what (purchase received, transfer, sale, refund, correction, write-off), the product, how many, From and To, the price, the reference or reason, and Recorded by. Sales and refunds from the counter appear here by themselves, with their receipt numbers.
Good to know
- Stock can never go below zero. A sale or transfer can only take what you have, minus anything kept aside for orders. If there is not enough, nothing changes.
- Nothing in Stock history can be edited or deleted. To fix a mistake, record a Stock correction: it shows next to the old line.
- Sales and refunds are recorded only at the counter (Point of Sale), never by hand here.
Expiry dates and batches
▶Step by step in pictures: medicines with expiry dates20 pictures. In each, an orange ring shows where to type or tap.Start →For medicines, food and cosmetics. The app keeps each delivery with its expiry date. It sells the one that expires first, and never sells what has expired.
- On Stock, press Edit on a product and tick Has an expiry date. A pharmacy can turn it on for every product at once on the Expiry page.
- Stock comes in with Purchase stock (or the stock column of an import, which is a purchase too). Each time, type Expires on. The month is enough: 03/2027 means the end of March 2027. If you like, type the batch number from the box.
- Sell as usual. The sale takes the batch that expires first, and the receipt shows Exp. Mar 2027 under the item.
- Open Expiry in the menu: what has expired, and what expires within 30 or 90 days, with the cost of each batch.
- Press Write off stock on an expired batch: the Write off stock form opens with that batch and Expired filled in. It leaves stock and shows in Stock history.
Good to know
- Expired stock is never sold: the Sell page leaves it out of “in stock”, and a product with only expired stock says Expired — write it off in Inventory.
- Stock you had before you ticked the box has no date. It sells after the dated stock. On the Expiry page, No date yet → Give a date: count the boxes with one date and save them.
- Two dates in one delivery: receive it in two goes, one per date.
- A refund puts the item back into the batch it was sold from. A transfer moves the oldest batches first, dates and all.
- You cannot untick a product while some of its stock has a date: sell or write it off first.
- Expiry dates work for products kept in Inventory (every new business sells from Inventory).
Your shop page: show customers what you have
▶Step by step in pictures: your shop page and product photos15 pictures. In each, an orange ring shows where to type or tap.Start →One web page for your customers: your products, their prices and whether each is in stock. They open it on their phone from a link you send or a QR code at your counter, and ask you about a product on WhatsApp. They cannot order or pay on it. It is off until you turn it on.
- In Inventory, open Settings and press Turn it on on the Shop page card. (Also in the menu: Setup → Shop page, or Businesses → Shop page.) Only the owner sees it.
- Type the Address of your page: English letters, numbers and - only, for example monica-grocery. Your link is then retailops.ssstrading.site/shop/monica-grocery.
- Choose what customers see: Show prices, Show items that are out of stock, Show your phone, WhatsApp and address (from your pad), and Let Google find this page. The preview beside it shows exactly what customers will see.
- Press Turn on. Then Copy link, Share on WhatsApp, or Print QR code for a sign at the counter.
Product photos
- On Stock, press Edit on a product.
- Press Take or choose a photo. On a phone, the camera opens. A big photo is fine: the app makes it small by itself.
- Press Save changes. The photo shows on your shop page, on Stock beside the name, and on the Point of Sale Sell page.
To change it, press Change photo; to take it away, Remove photo. A product with no photo shows its first letter.
Keep a product off the page
While the page is on, Stock shows Choose what it shows: untick what customers should not see (wholesale sacks, prescription medicines) and press Save. For one product, Edit → Hide from shop page does the same. It still sells at the counter as before.
Good to know
- Customers see In stock, Few left (at or under the low-stock level) or Out of stock. Never how many you have, what you paid, your suppliers or your warehouses.
- The price is the selling price at the counter. A product without one says Ask for price.
- Stock held for an online order does not count as in stock, and expired stock never does.
- Press Turn off on the Shop page any time: the link then says the page is not available. Changing the address breaks links you already shared.